A clogged or broken sewer line can cause significant damage and pose health hazards. Professional plumbers have the expertise and tools to fix a sewer line correctly, preventing further issues and costly repairs down the road. Contact Plumbing Express, Inc. for professional help.
A quality sewer repair should be quick and easy for homeowners to schedule. The longer a damaged sewage pipe leaks, the more damage it can cause.
Most homeowners have dealt with a clogged drain or toilet at some point. While a plunger or drain-cleaning service may fix these problems, serious clogs in your home’s sewer line can require more invasive repair solutions. A professional plumber will be able to identify the source of the clog and recommend the best solution.
The most common cause of a sewer line clog is accumulated debris inside the pipes. To help prevent this, only flush human waste and toilet paper down your drains. Avoid pouring oil, grease, fats, and other household waste down the drains, as these will harden and lodge within your pipes, creating a costly and inconvenient clog. You can also install drain catches in your kitchen and bathroom to prevent these items from entering the drains.
Damaged pipes are another common cause of sewer clogs. These can be caused by corrosion, leaks, or even tree roots. To prevent this, regularly have your pipes inspected for cracks or leaks. A professional plumber will be able to repair or replace your sewer pipes as needed.
Another common cause of clogs is poor slope in your sewer lines. When a slope is too low, wastewater will collect in the pipe and cause it to sag. This can cause wastewater to back up into your home and create a foul odor. To avoid this, have your plumbing system inspected by a professional plumber to ensure it is properly sloped.
If you have a damaged sewer line, it is important to get it repaired as quickly as possible. Not only will a clog cause costly and inconvenient backups in your home, but it can also put your health at risk. Sewage contains dangerous and harmful bacteria that can be spread through your drains if the line is not fixed immediately.
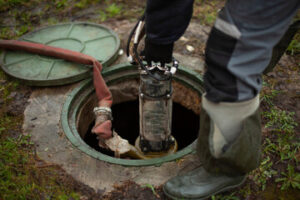
There is no do-it-yourself method for repairing a main sewer line, as these pipes are buried underground and far away from your home. A professional plumber will use specialized equipment to clean and repair the line. This can include hydro jetting, which uses high-pressure water to blast away clogs and debris. They will also inspect the line for any signs of damage or collapse and recommend the best course of action.
Gurgling
When a sink or toilet is gurgling, it may be a sign that the drain is blocked or that there are issues with your home’s sewer line. In either case, the sound can be quite unsettling and requires a professional to take a look. A clog in a single sink or drain will often cause a gurgling sound, but if you notice the noise is coming from multiple sinks at the same time, it could mean there’s an issue with the main sewer line.
A blocked sewer line can cause a variety of problems for homeowners, including sewage backups and broken pipes. It’s important to have the issue addressed as soon as possible, as it can lead to a lot of damage to your home and a serious health risk. A plumber can quickly diagnose the problem and determine the best course of action, whether it’s a simple blockage or a full replacement of the entire line.
Depending on the cause, the repair can be relatively quick and inexpensive. For example, if the issue is caused by an obstruction, such as hair or soap scum, the blockage can usually be cleared with a plunger or hand snake auger. A professional will also be able to clean and inspect the sewer line for any signs of cracks or collapse, which can be more difficult to detect without a camera inspection.
Another common reason for a gurgling drain is that the pipes aren’t properly venting. The vent pipes allow air to pass through the drain system to balance out pressure, but if they’re blocked, it creates a vacuum effect that can pull water and waste back into the sinks. It’s essential to have the venting issues fixed as soon as possible to prevent serious plumbing problems and prevent the gurgling from continuing.
The main sewer line is the pipe that carries all the waste and water in your home to the municipal sewer system or septic tank. This pipe can get clogged just like any other drain in your house, but it’s often more difficult to fix. A sewer line clog is more likely to affect the whole home, so it will require a more thorough and expensive repair.
Damage
Your home’s sewer line is responsible for the transport of waste from your home to the sewage treatment plant or septic tank. This means that if your sewer line becomes damaged, you could experience a number of unpleasant side effects like foul odors or wastewater backups. Fortunately, you can prevent most problems with proper maintenance and routine drain cleanings.
One of the most common causes of sewer damage is tree roots. These roots can grow into and around the pipes, causing cracks and leaks. You can reduce the risk of root intrusion by trimming nearby trees and using a non-toxic, commercial root killer.
Other common causes of damage include ground shifting and settling. This can strain or break sewer lines, especially if the lines are made of steel or cast iron. Sewer lines can also be crushed by heavy equipment used for construction or landscaping.
When you call a professional plumber for a sewer repair, the first step is diagnostics. Your plumber will use a video camera to check the condition of your pipes and determine their location on your property. They will then mark the location of your pipes with spray paint, as well as any utility lines that run through or above them. This will help to minimize any excavation or disruptions to your home during the repair process.
Depending on the cause of your sewer problem, there are several different repair methods. One option is to have your pipe replaced with a new one. This can be done with traditional excavation, but a more convenient option is trenchless pipe replacement. With this method, your plumber will insert a tube of polyester or fiberglass impregnated with resin into the damaged pipe. This resin is inflated with a bladder, and it bonds to the interior surface of the pipe, sealing any cracks or gaps.
Another option for repairing your sewer line is to have it patched. This is a quick and cost-effective solution for minor damage, but it is not suitable for larger holes or cracks in your pipe. If you have a large hole or crack in your sewer line, your plumber will recommend a trenchless pipe replacement instead.
Cost
The cost of sewer line repair depends on the size of the pipe, the type of damage and whether it needs to be replaced. Usually, a professional plumber will recommend a repair or replacement only when it is absolutely necessary. This is because trying to fix a broken line without a proper diagnosis could worsen the situation, cause further costly damages and create health risks from sewage backups in your home.
Traditional sewer line repair methods involve major digging up of the property which can result in the destruction of landscape, driveways, structures near the damaged area and other costly repairs. In such cases, a professional plumber may suggest trenchless sewer line repair options. These are less invasive and take considerably lesser time to complete. They also cost significantly less than the traditional option.
Some of the common trenchless sewer line repair techniques include cured-in-place pipe lining, pipe bursting and spin-casting. Cured-in-place pipe lining costs between $80 and $250 per linear foot and involves inserting and inflating an epoxy coated liner into the existing pipe. This method creates a “pipe within a pipe” which is more durable and fully functional than the original pipe.
Another trenchless method is pipe bursting which costs between $60 and $200 per linear foot on average. In this technique, a cone-shaped bursting head is inserted into the old pipe and is maneuvered to break it apart while pulling in a new pipe at the same time. This method replaces the entire piping with a much stronger and more durable one that can handle more pressure.
If the sewer lines are severely damaged, the best option is to go for a complete replacement. This can be done with trenchless or conventional methods and it is recommended to consult a professional plumber for the most accurate quote.
It is important to note that most homeowner’s insurance policies don’t cover damages or loss caused by a faulty sewer line. However, if the damages are the result of an event such as vandalism or tree roots, the damages may be covered.
Getting your sewer lines repaired or replaced is essential to maintain the integrity of your plumbing system. It reduces the risk of clogs, backups and other costly problems and also helps to keep your house or business running smoothly.